 31")
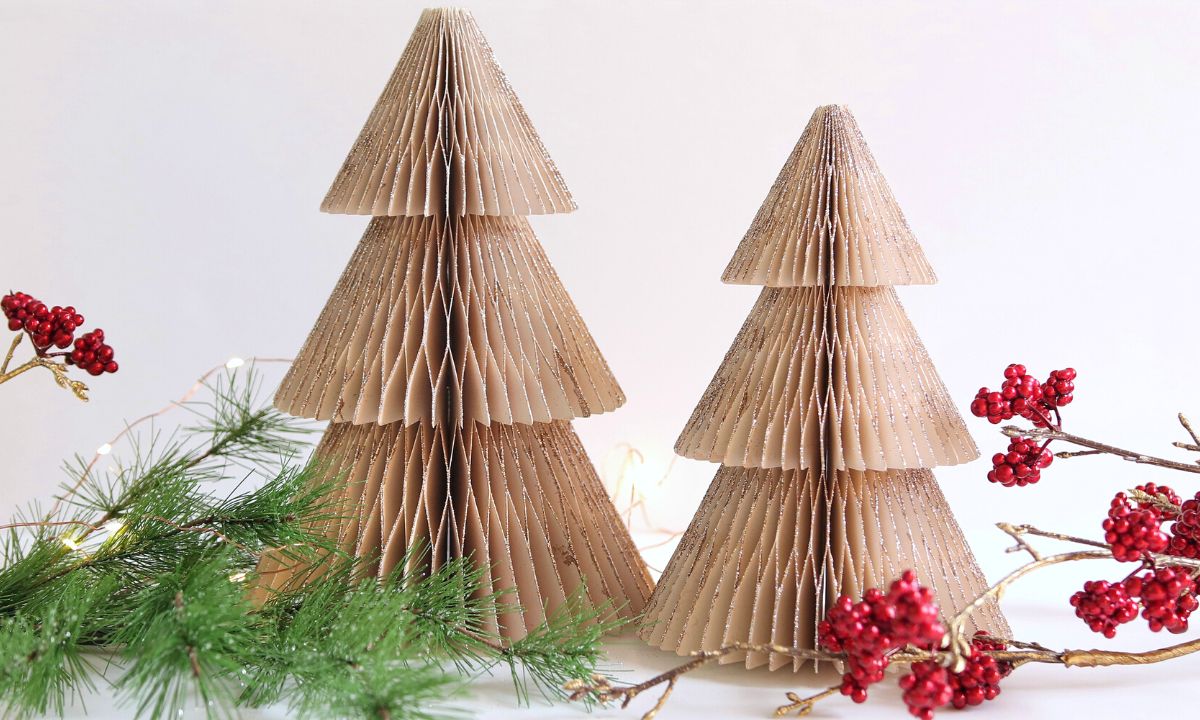
Are you ready to infuse your holiday season with a touch of elegance and creativity? If so, I’m thrilled to share with you a fantastic and easy DIY project – How to make a Christmas tree out of paper!
With just a few simple materials and a little bit of time, you can create your very own high-end looking paper Christmas trees that will wow your family and friends, and rival store-bought decorations (promise🙌)!
To be honest, I was really inspired by the paper decor pieces from West Elm.
 1")
But here’s the thing: this kind of paper decor is so trendy and popular right now so you can find it for sale in just about any store that sells Christmas decorations.
I saw similar pieces at Crate and Barrel, Ikea, Michael’s, Studio McGee, just to name a few.
So people are actually buying this type of paper decor, and I totally get why. It looks so elegant and beautiful.
 2")
But instead of splurging on store-bought pieces, why not try making your own?
And the best thing is that you can make these paper Christmas trees in any color and size you need to match your theme and other decor that you already have!
So if you’re ready, let’s get started!
I have prepared free Christmas tree templates for you in 3 sizes, so you can download them right here:
It will be a very nice bonus if you have a cutting machine, because you can cut all the parts much faster and they will all be perfect.
But don’t worry if you don’t have a cutting machine, because I always include PDF files with my templates, so you can print them on a regular printer and cut out the pieces by hand.
It will take a little bit longer but it’s absolutely doable!
If you want more options to customize your decor and expand your creativity, I’ve designed an amazing collection of different Christmas tree templates that will give you a wide variety of styles and sizes to choose from!
 3")
It’s really important what kind of glue and what kind of paper you will use for this project, because the speed and quality of your work will depend on it!
❌ Regular craft glue takes too long to dry and is too runny, so it’s not the best option.
❌ Hot glue is also absolutely not suitable for this project, because it hardens way too quickly and has volume that is visible between sheets of paper.
 4")
✅ So you need a glue that grabs quickly and dries fast, but it still should be craft glue (so it doesn’t dry too fast and allows you enough time to manipulate the paper before it sets completely).
I myself have used this glue, but you can use any other craft glue as long as it says it dries quickly.
 5")
 7")
 9")
Please do not use too thick paper as it will be very difficult for you to work with it.
The optimal paper weight is 120 gsm (80 LB Text) for smaller items and 175 gsm (65 LB Cover) for larger items.
For example, my paper Christmas angels (made using the same technique) are made from 120 gsm paper, and my largest Christmas tree (12 inches high) is made from 175 gsm paper.
 11")
💡 If you’ll be using metallic papers, be aware that often they have a sleek surface due to the metallic layer on top, which can make them challenging to glue and handle compared to regular paper because of their high level of slickness.
 12")
💡 Also make sure to avoid using paper that has a white layer on the inside (not fully dyed). If you use that kind of paper, you’ll end up with ugly white edges that don’t look good at all. So choose paper that is colored all the way through and has a clean-cut edge. That way, your finished project will have a much better appearance.
 13")
 15")
 17")
I suggest using 40-50 pieces.
With 40 pieces, the “accordion” will be more stretched, resulting in larger cells.
If you prefer a denser look, 50 pieces should be enough, but you can always add more if you like.
 19")
I start by folding all the pieces in half.
If you cut them with a cutting machine, it will make this step even easier because you’ll have scoring lines to guide you in folding them precisely at the center.
Also please note that it’s important to fold all the pieces the same way and on the same side, as the glue lines are positioned differently on the two halves.
 20")
Alright, let’s get gluing!
First glue each piece individually until you have glued all of them.
And remember, as soon as you glue each piece, do not forget to immediately put it under the press. I personally use a box of glue sticks as a makeshift press because it’s heavy enough to get the job done.
 21")
After I’ve glued all the individual parts, I start gluing them together in pairs.
Please note that now the gluing spots will be different!
So it turns out that you glue each part individually in certain places. But as you start connecting them together, the glue places will shift and you’ll be attaching them to each other in different places.
 22")
Try to avoid applying glue too close to the edges, especially if you’re working with a runny glue.
If the glue squeezes out, it may stick the parts together in places where you don’t want them to stick. And trust me, separating them afterward can be a real challenge. Therefore, try to be especially careful when gluing around the edges.
 23")
Once you’ve glued all the pairs, start gluing two pairs together, then progress to four pairs, and continue in this manner.
The idea behind this approach is to create smaller piles of glued parts first, then combine them into medium-sized piles, and eventually into larger ones.
 24")
This method helps ensure a more even and leveled final piece. Because if you start to glue all the parts one on one forming one big pile, you most likely will end up with an uneven structure. I hope this makes sense.
When I glue each stack, I align it using my desk along the straight edges, and I do this every time.
 25")
After you’ve completed gluing all the details together, place the project under something heavy to allow the glue to fully dry.
My glue dries completely in about 15 minutes, but be aware that drying time may vary depending on the type of glue you’re using.
Now comes the most exciting part of the whole process – open the tree up and see what we got!
 26")
To glue the tree together, apply glue to the same places where you glued the parts between each other, align all the edges, and then fix it well with clips at several points (I use binder clips and regular paper clips for the top part).
Remember to be careful and not to apply glue too close to the edges.
 27")
Once the glue has thoroughly dried, I remove the clips and check all the pieces to make sure they are all open.
If you notice any edges that have stuck together, try to carefully separate them with a craft knife.
 28")
If you are a fan of shimmer and sparkle, then this last step is for you🤩!
As you may have noticed, I personally love covering all my pieces with glitter because it adds that extra touch of holiday magic ;-).
 29")
You will need any regular white craft glue that becomes transparent after drying (I don’t recommend using initially transparent glue because you will not be able to see where you’ve applied it and where not), a sponge brush, and a fine glitter.
 30")
Using a sponge brush, I apply the glue on small areas at a time, beginning from the bottom and gradually moving upward.
Once you’ve applied the glitter everywhere, be sure to allow the glue to fully dry. And when the glue is completely dry, you’ll want to seal the glitter to prevent any shedding or flaking.
For this, I recommend using a Mod Podge spray (but make sure the bottle says “ultra gloss” and not matte).
 33")
 35")
Just spray it all over so that the Mod Podge covers all the glitter very well and let it dry completely.
And then don’t forget to give your piece a good shake to shake off any remaining glitter, and also go over with a dry brush as well.
 37")
Keep in mind that the density of your piece will impact the area available for glitter application.
If you have a denser piece with more paper, you’ll have more surface area to apply the glitter to. Conversely, if you use fewer paper pieces and stretch the “accordion” more, the areas for glitter application will be smaller.
And here are the beautiful trees that I got!
I hope this tutorial has inspired you to create your very own paper Christmas tree.
And I’d love to see how your paper trees turned out, so don’t forget to leave a comment below👇 and share your beautiful creations with me😍.
Happy crafting and Merry Christmas!
Disclaimer: product links may include affiliate links.
I’m Oksana and I love paper flowers and all things paper. Here at FancyBloom I design new flower templates, make paper flower tutorials, and share my ideas and inspiration for fancy and modern craft.
Now check your inbox to get an email with the freebie inside.
I can’t wait for you to dive in!
If your email doesn’t arrive in a few minutes, don’t worry. Be sure to check the spam folder and promotions tab.
If you believe there’s a problem, write to [email protected] and I will take care of you as quickly as possible.

4 Responses
Wow! You are amazing, kind, beautiful, and your work looks so professional! I too, came across the West Elm paper trees and was looking for a good tutorial on how these are made. You thought about everything – the templates and marking the lines of where to glue is making me super excited to start this project this weekend!
I just want you to know that I greatly appreciate the work you have put into this and your website looks so wonderful too.
I hope my trees turn out as amazing as yours did.
Love,
Tia 🙂
Dear Tia,
Thank you so much for your incredibly kind words🙏🏼! I’m absolutely thrilled that you found the tutorial helpful and that you’re excited to start your own project! It means a lot to hear that you appreciate the effort I’ve put into creating the templates.
I’m sure your paper trees will turn out beautiful! Remember that the most important thing is to enjoy the process and have fun while crafting.
If you ever have any questions or need further assistance along the way, feel free to reach out. I’m here to help💖.
Love everything about you
Aww you’re too kind Meraj!🙏🏼 Hugs💖